1. Introduction
This guide provides an overview of the necessary settings for synchronising tasks and appointments. It also includes information on how to check the synchronised data and on the analysis tools available in BMD NTCS.
1.1. Technical setup
Before synchronisation can be used, some installations must be performed. This can be done by your system administrator or IT technician. Alternatively, our BMD IT support team can handle this for you in a quick session.
1.1.1. Minimum requirements
Operating system:
- Windows Server 2016
- Windows Server 2019
- Windows Server 2022
Email server:
- Exchange Server 2016 CU23
- Exchange Server 2019 CU14
- Microsoft 365
Please ensure that the basic installation of BMD NTCS has been successfully completed beforehand. The service must be set up directly on the BMD NTCS server.
1.2. Basic BMD NTCS settings
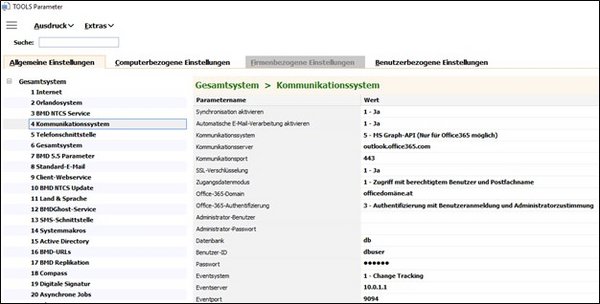
To enable synchronisation with an Exchange Server or Microsoft 365, the following TOOLS parameters must be configured:
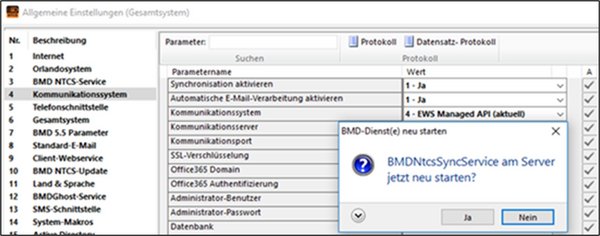
TOOLS → Tools → Settings → TOOLS parameters → Overall system → “Communication system”
The BMD IT support team typically configures these settings for you if you book a setup appointment.
If you choose the option “EWS Managed API”, the following parameters must be set:
Activate synchronisation | This parameter allows you to generally enable and disable synchronisation between BMD NTCS and your communication system. |
Communication system | In this parameter, you should select the following option for the communication with the Exchange Server: 4 - EWS Managed API
Select this option if you wish to synchronise BMD NTCS with an Exchange Server using an API interface. |
Communication server | Here, you have to enter the server name or the IP address of your external communication server (Exchange, Microsoft 365). Note If you use SSL encryption, you should specify the name from the certificate in order to prevent certificate errors. |
Communication port | Here, you have to enter the port through which your communication server can be accessed. - Exchange without SSL: 80 - Exchange with SSL: 443 - Microsoft 365: 443 |
SSL encryption | Here, you can define whether data transmission to the communication system should be secured using SSL encryption (HTTP or HTTPS). Please set this parameter to: 1 - Yes |
Login details mode | Define the mode for accessing the Exchange mailboxes. The following options are available: 0. Access using own user and password 1. Access using authorised user, password and mailbox name 2. Access using authorised administrator, admin password and mailbox name 3. Access using DNC (Default Network Credentials) and mailbox name
Please note: this parameter does not apply for synchronising with Microsoft 365 if the parameter Microsoft 365 authentication is set to “Authentication with user login and administrator consent”. |
Database | In this parameter, you have to store the database alias of every database where appointments and tasks should be stored by the sync service. |
User ID | In this parameter, you have to store the BMD NTCS user to be used when writing data entries (tasks and appointments) from the communication system to BMD NTCS.
Recommendation: create a separate user that is used exclusively for synchronisation purposes. This user must belong to the authorisation group BMD group with full access. |
Password | Here, you have to store the password of the BMD NTCS user that you stored in the parameter “User ID”. |
Event server | In this parameter, you have to enter the server name or the IP address of the server where BMDNTCSSyncService is installed and running. The Exchange Server must be able to reach this IP address. Moreover, you have to enable port forwarding on the firewall (see parameter “Event port”) and enter the public IP address required to reach the server. For a local Exchange Server, enter the internal IP address. |
Event port | In this parameter, you have to enter the port used by BMDNTCSSyncService to communicate. For the EWS Managed API, this port must be accessible via the internet. |
1.3.2. Synchronisation login details
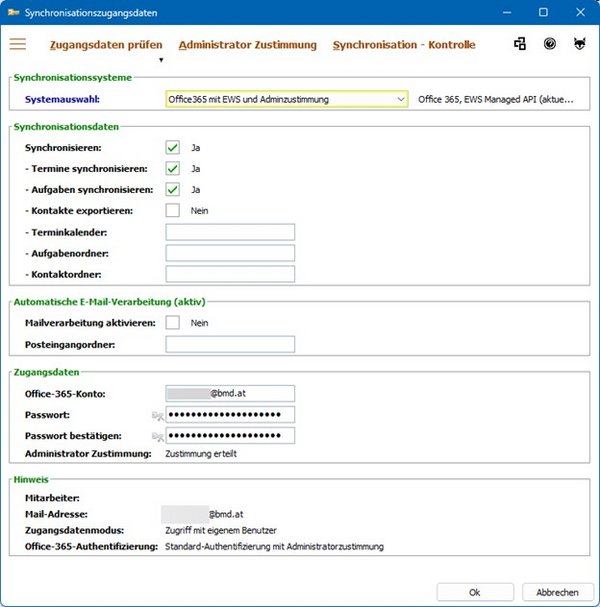
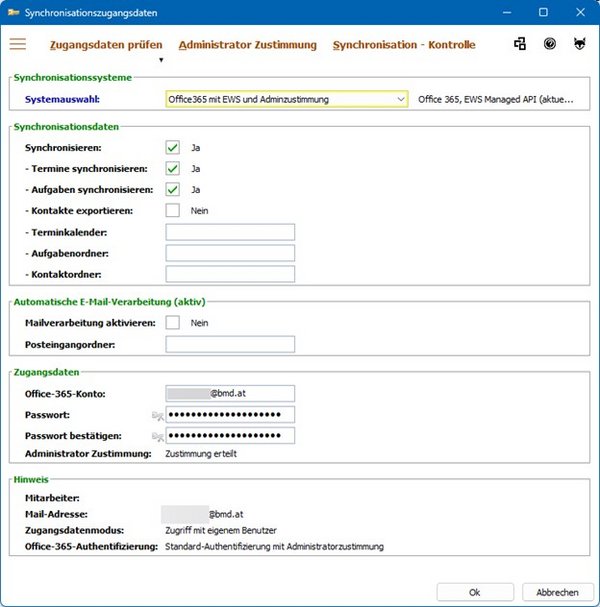
Once the service has been installed and the general settings configured, any user with the appropriate authorisations in BMD NTCS can activate synchronisation for their own user.
These settings can be found under TOOLS → Tools → Settings → Login details → “Synchronisation login details”.
For more information about this window, please refer to the Help for the window “Synchronisation login details”.
The fields available in the area “Login details” depend on the parameter “Login details mode”. Please refer to that parameter for further information.
1.4. Login details mode
In the parameter “Login details mode”, you can define the mode to be used when accessing the mailboxes in Exchange. You can find it under TOOLS → Tools → Settings → TOOLS parameters → Overall system → “Communication system”.
Login details mode | Define the mode for accessing the Exchange mailboxes. The following options are available: 0. - Access using own user and password 1. - Access using authorised user, password and mailbox name 2. - Access using authorised administrator, admin password and mailbox name 3. - Access using DNC (Default Network Credentials) and mailbox name The authorised user and the password need to be stored in the service.
Please note: this parameter does not apply for synchronising with Microsoft 365 if the parameter Microsoft 365 authentication is set to “Authentication with user login and administrator consent”. |
Note:
If you are using Microsoft 365, you also have to configure the parameter Microsoft 365 authentication.
For more details, please refer to the section “Synchronisation with Microsoft 365”.
Note:
If you change the password of the operating system user, make sure to promptly update the password in the synchronisation settings as well.
If the password is not updated, the operating system will register a login attempt with an incorrect password, which triggers a notification to the affected user, prompting them to check their login details. Information on which settings you need to make to enable this notification, can be found in the section Notifications for incorrect login details.
In such cases, synchronisation will be stopped for this user. A reconnection attempt will only be made after approximately 50 minutes. Additionally, an entry will be created in the log file “BMDMergeService.log”, indicating that the user's login details need to be checked.
Problems may arise if the network security settings are configured to lock the Windows account after a certain number of failed login attempts. Often, only an administrator can reactivate a locked account, which can be problematic—especially outside regular office hours.
1.4.2. Access using authorised user, password and mailbox name
If you select this option, you can use the login details (domain\user and password) of a designated user for synchronisation in your Exchange account. To synchronise with your personal Exchange account using this user, you also have to enter the corresponding email address in the field Mailbox name (email address).
Note:
A prerequisite for this login method is that the user entered in the login details must have write permission for the entered mailbox.
1.4.3. Access using authorised administrator, admin password and mailbox name
If you select this option, you have to store the login details for synchronisation in the following parameters, to be found under TOOLS → Tools → Settings → TOOLS parameters → Overall system → “Communication system”.
Administrator user | In this parameter, you have to store the administrator user for synchronisation with the Exchange mailboxes of your employees. The appointments and tasks are then created in the respective Exchange mailbox with this user. The prerequisite for this method is that the user stored here is authorised to access the mailbox.
Note: This parameter only has an effect if you selected the option Access using authorised administrator, admin password and mailbox name in the parameter Login details mode. |
Administrator password | Here, you have to store the password of the administrator user that you stored in the parameter “Administrator user”. |
Note:
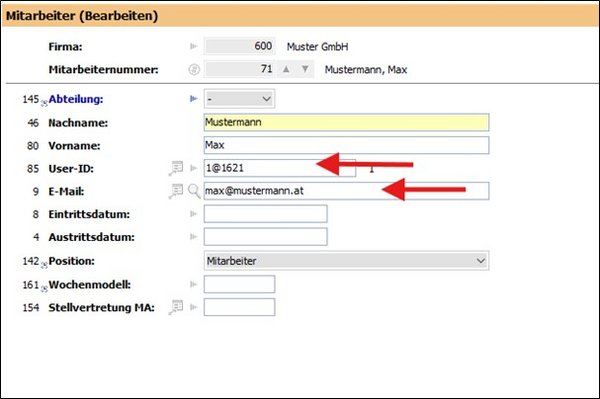
The main email address from the employee master data of the BMD NTCS user is automatically used as the mailbox. The area “Note” in the window “Synchronisation login details” indicates which mailbox will be synchronised.
1.5. Checking the login details
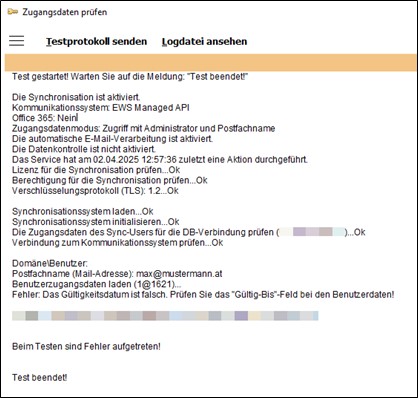
You can use the function Check login details in the window “Synchronisation login details” to test whether synchronisation is possible with the login details you entered and whether they match the general settings in the TOOLS parameters.
Potential sources of error that may affect synchronisation will be listed in the log. Ideally, each check will get the result “...OK”, followed by a final message stating “Test completed!”.
1.6. Notifications for incorrect login details
Users with active synchronisation can also be notified when their login details are incorrect. You can specify whether and how they are to be notified using the parameter “Login details notification”. The parameter and the available notification options can be found under TOOLS → Tools → Settings → TOOLS parameters → Overall system → “Communication system”.
Login details notification | Users with active synchronisation can define here whether and, if so, how they wish to be notified if the synchronisation login details are incorrect.
The following options are available: 0 - Send internal message 1 - Send email 2 - Send email and internal message 3 - Do not send a message |
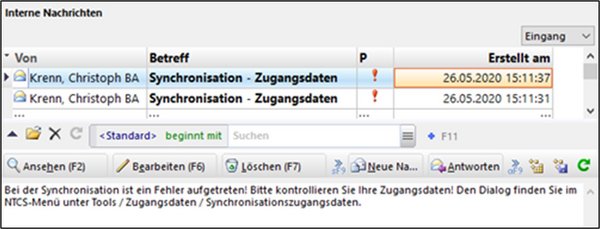
Currently, the following message is sent if the synchronisation login details are incorrect: There was an error during synchronisation. Please check your login details. You can find the dialogue in the Tools menu under Tools -> Settings -> Login details -> “Synchronisation login details”.
This is an example for an internal message.
When an appointment or task is entered in BMD NTCS, it is temporarily stored in the window BMD synchronisation data. Every 2 to 3 minutes, BMDNTCSSyncService retrieves these data and synchronises them with Exchange.
When an appointment or task is created in Exchange/Microsoft 365, BMDNTCSSyncService receives a change event. The service processes this event within 10 seconds and then writes the appointment or task to the database.
Note:
After successful synchronisation, the same sync ID is assigned in Exchange/Microsoft 365 and in BMD NTCS. This ensures that if an already synchronised appointment or task is changed or deleted, the correct data record is updated or deleted in the other system.
Note:
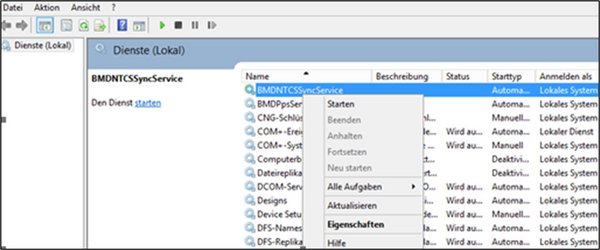
You can restart BMDNTCSSyncService at any time without risking data loss. However, this might happen if the service remains inactive for an extended period:
- All appointments and tasks entered in BMD NTCS will only be synchronised with Microsoft 365 once the service is restarted.
- Appointments and tasks entered in Exchange/Microsoft 365 will trigger attempts to contact the service at regular intervals. However, at some point (the exact time is not known), Exchange/Microsoft 365 will stop making attempts and the appointments will no longer be synchronised, even after the service is restarted. For this, a control mechanism is in place.
1.7.2. Incorrect synchronisation
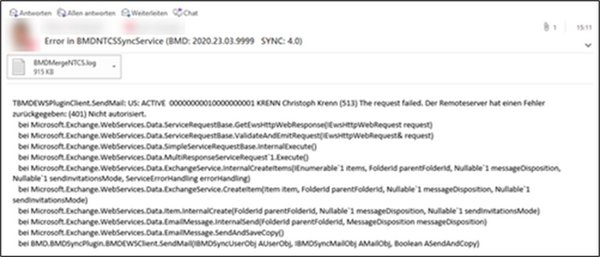
You can choose to receive an email notification if an error occurs during synchronisation (for example, if a user has stored incorrect login details or if there are issues with the service).
In the parameter “Notification recipient (sync administrator)”, you can specify the email addresses to which error notifications are to be sent. You can find the parameter under TOOLS → Tools → Settings → TOOLS parameters → Overall system → “Communication system”.
Notification recipient | Here, you can enter the email address of the synchronisation administrator who should receive notifications from BMDNTCSSyncService if an error occurs.
Additionally, the data monitoring log (if active) can be sent to this email address. Please refer to the parameter “Data monitoring log”. |
The users stored in this parameter will receive an email with an extract from the current error log or with the full BMDMergeNTCS.log file attached, which can be used for detailed error analysis.
1.8. BMD synchronisation data
When a user with active synchronisation creates, modifies or deletes an appointment or task in BMD NTCS, an entry is created for this in the window “BMD synchronisation data”. BMDNTCSSyncService then processes these records one by one.
You can see whether data have already been synchronised and the data type indicates whether the record refers to a task or an appointment.
Note:
- If the service is running, the data records will still be available as a log for around 2 months after synchronisation. Older data records are automatically deleted to prevent the list from becoming too long.
- If the service is not running, these data records will remain “Open” until you start the service. The data will then be synchronised in sequence.
1.8.1. Processing the synchronisation data
You can also manually initiate synchronisation in this window using the Synchronise button. This action transfers all open tasks and appointments directly to Exchange/Microsoft 365. Currently, this method does not require the synchronisation service.
You can use the Open button to reopen completed synchronisation records and attempt to synchronise them again. This can be useful for entries that were marked as completed but were not synchronised due to a request error. This might happen, for example, if you use incorrect login details because you changed the password for your Exchange account. In such cases, you can correct the login details and manually reopen the affected entries. The service will then process them again.
The button Finish has the opposite effect. It allows you to mark tasks and appointments that have not yet been synchronised as “Completed”, preventing them from being synchronised by the service.
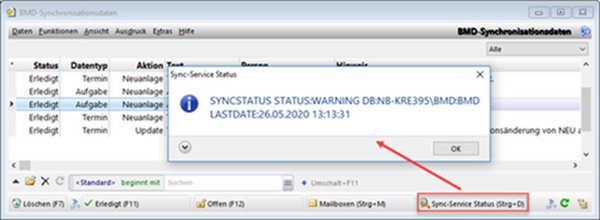
1.8.2. Status of BMDNTCSSyncService
In this window, you can check whether the sync service is currently accessible or when it was last accessible. The status “WARNING” or “ERROR” does not necessarily mean that BMDNTCSSyncService is not running. It may simply be under heavy load and temporarily unable to respond.
1.8.3. Synchronisation check
This function starts a window where you can identify appointments and tasks that either do not exist in both systems or are not identical. This helps you detect and correct any differences. For more details, please refer to the section “Manual data monitoring”.
2. Synchronisation with Microsoft 365
If you are synchronising with Microsoft 365, please ensure the following aspects are taken into consideration.
2.1. Parameter settings
You have to configure the synchronisation parameters for Microsoft 365. The parameters are essentially the same as those from the section “BMD NTCS settings”, but only the ones relevant to Microsoft 365 synchronisation are listed here.
Communication server | Here, you have to enter the server name or the IP address of your external communication server. Für Microsoft 365, please enter: outlook.Microsoft365.com
Note: If you are using SSL encryption, you should specify the name from the certificate in order to prevent certificate errors. |
Communication port | Here, you have to enter the port through which your communication server can be accessed. For Microsoft 365: 443 |
SSL encryption | Here, you can define whether data transmission to the communication system should be secured using SSL encryption (HTTP or HTTPS). Please make the following setting: 1 - Yes |
Login details mode | Define the mode for accessing the Microsoft 365 mailboxes. The following options are relevant: 1. Access using authorised user, password and mailbox name 2. Access using authorised administrator, admin password and mailbox name 3. Access using DNC (Default Network Credentials) and mailbox name
Please note: this parameter does not apply for synchronising with Microsoft 365 if the parameter Microsoft 365 authentication is set to “Authentication with user login and administrator consent”. |
Microsoft 365 domain | In this parameter, you can enter the name of your Microsoft 365 domain, e.g., outlook.Microsoft365.com. |
Microsoft 365 authentication | In this parameter, you can define the access mode for the synchronisation with Microsoft 365. The following options are available:
We recommend using authentication with user login and administrator consent. This is considered best practice to ensure the security and integrity of your systems. Further information can be found in the synchronisation documentation under “Microsoft 365 authentication”. |
For more information about this window, please refer to the Help for the window “Synchronisation login details”.
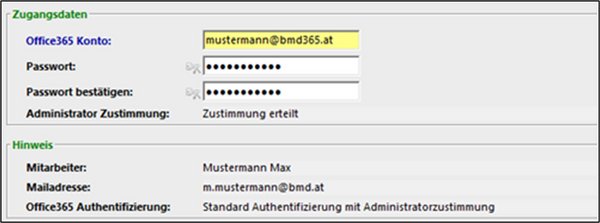
In addition to the CRM master data of your employee (name and email address), the Microsoft 365 authentication method selected in the parameter is also displayed in the area “Note”.
2.2.2. Authentication with user login and administrator consent
If you select this option, you no longer need to enter any data in this window, as the Microsoft 365 account is determined automatically based on the employee's main email address. The login details are saved for your BMD NTCS user via the function User login.
This authentication method is recommended if you use two-factor authentication when signing in to Outlook (Exchange 365/Microsoft 365). Consent is required for this process from the Microsoft 365 administrator and from the user. You can check whether consent has already been granted in the fields Administrator consent and User login in the area “Login details”.
Administrator consent
In addition to your login details, consent from the Microsoft 365 administrator is also required for synchronisation. You can check whether consent has already been granted in the field “Administrator consent” in the area “Login details”.
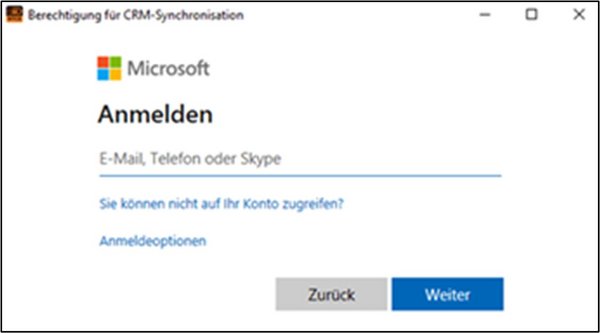
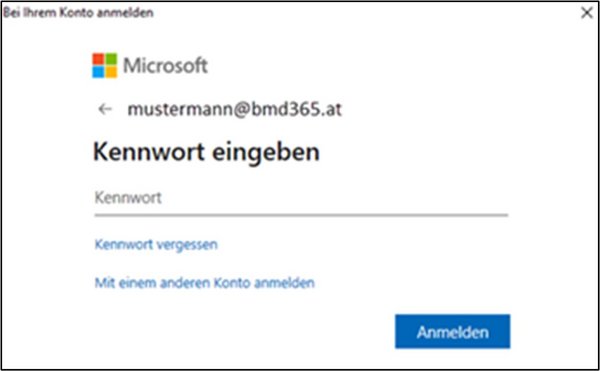
If consent has not yet been given, it can be granted using the function “Administrator consent”. This step only needs to be completed once and applies to all users. The following dialogue box will then open, prompting the Microsoft 365 administrator to enter their login details in order to give consent.
2.3. Other settings
You have to configure port forwarding on the firewall to enable the transfer of appointments and tasks from Microsoft 365 Outlook to BMD NTCS.
3. Data monitoring system
BMD NTCS offers several options for identifying discrepancies between BMD NTCS and Exchange/Microsoft 365. These checks, as well as conflict resolution, can be performed manually or automatically.
3.1. Manual data monitoring
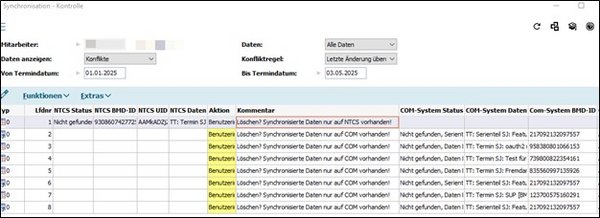
In the window Synchronisation check, you can identify appointments and tasks that are not identical in both systems. You can open this window in the “BMD synchronisation data”.
In the entry fields, you can define the search criteria, such as the period to be checked for differences and whether appointments, tasks or both should be included in the check.
The list displays all appointments and tasks that either exist only in one of the two systems (BMD NTCS or Exchange/Microsoft 365) or exist in both systems but are not identical. The field “Action” suggests a solution for each difference. The following actions are available:
BMD NTCS → COM (synchronise) | This action is suggested if the appointment or task does not yet have a sync ID in the current system, which means that the appointment or task has probably never been synchronised before and therefore needs to be synchronised. |
Delete data | This action is suggested if the appointment or task already has a sync ID in the current system. However, since this appointment or task is no longer available in the other system, it can be assumed that the deletion was not synchronised correctly. |
No action | You can manually select this option if you do not want to correct the entry. |
According to defined conflict resolution | For appointments or tasks that exist in both systems with the same sync ID but different data, the conflict rule selected in the entry field “Conflict rule” is suggested here. |
You can use the buttons Synchronise data and Synchronise selected data to correct either all or only the selected entries. For this type of synchronisation, BMDNTCSSyncService is currently not required because these data are directly transferred to the respective system.
3.2. Automatic data monitoring
There are two options for automatic data monitoring:
- You can choose to receive email notifications about differences at certain times and correct them manually.
- Alternatively, you can define conflict resolution rules in the parameters to enable automatic correction of differences, ensuring that the systems are consistently synchronised without user interaction.
You can configure this type of data monitoring under TOOLS → Tools → Settings → TOOLS parameters → Overall system → “Communication system”.
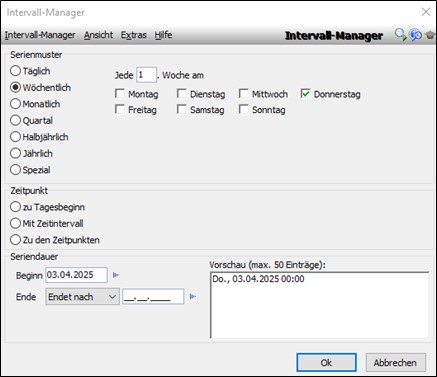
Data monitoring interval | In this parameter, you can define how often the data should be checked (e.g. every day at 02:00 AM). |
Activate data monitoring | This parameter allows each user to define whether and how often data should be checked automatically. If you activate data monitoring, you can choose whether differing entries should be corrected automatically (“Yes”) or only logged for manual correction later (“Yes, but log only”). |
Data monitoring objects | Here, you can define for which data types (tasks, appointments or all data) differences should be logged and corrected automatically. |
Note:
BMDNTCSSyncService must be running for both email notifications and automatic correction to function properly.
3.2.1. Email notifications for differences
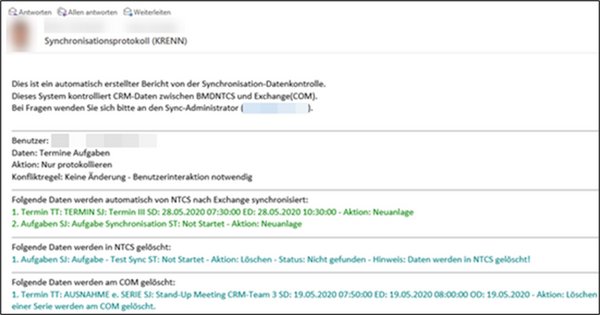
You can activate email notifications for differences using the parameter Data monitoring log. This parameter also allows you to specify the recipients of this log.
Data monitoring log | In this parameter, you can define who receives the log from data monitoring. The following options are available:
1 - Do not send log 2 - Send log to user 3 - Send log to administrator 4 - Send log to user and administrator
Note If you choose an option including an administrator, the email will be sent to the email address defined in the parameter “Notification recipient (sync administrator)”. |
To only email the log, you need to set the parameter Activate data monitoring to Yes, but log only.
Activate data monitoring | This parameter allows each user to define whether and how often data should be checked automatically. If you activate data monitoring, you can choose whether differing entries should be corrected automatically (“Yes”) or only logged for manual correction later (“Yes, but log only”). |
This email lists all differences, categorised by the type of resolution that would be applied if automatic correction were enabled.
Note:
We recommend starting with this option to get an overview of the differences, assess how frequently they occur and determine how they would be corrected without automatically correcting them.
3.2.2. Automatic data synchronisation
For automatic data synchronisation, you have to set the parameter Activate data monitoring to Yes.
Activate data monitoring | This parameter allows each user to define whether and how often data should be checked automatically. If you activate data monitoring, you can choose whether differing entries should be corrected automatically (“Yes”) or only logged for manual correction later (“Yes, but log only”). |
In addition, you have to specify the type of solution to be applied in case of conflicts in the parameter Data monitoring: conflicts.
Data monitoring: conflicts | Here, you can define, how synchronisation data conflicts should be resolved if automatic correction is enabled. The following options are available:
1 - No change – user interaction required 2 - Apply last change 3 - Always apply data from BMD NTCS 4 - Always apply data from the communication system
The conflict resolution method only applies to appointments and tasks which cannot be corrected automatically—i.e. if appointments and tasks exist in both systems with different data.
In order for this parameter to have an effect, the parameter Activate data monitoring must be set to Yes. |
If the data exist only in one of the two systems, automatic correction is carried out as follows:
- If the appointment or task does not yet have a sync ID, the appointment or task will be synchronised to the other system because the absence of a sync ID indicates that synchronisation has not yet taken place.
- If the appointment or task already has a sync ID, the appointment or task will be deleted from the respective system because the sync ID indicates that synchronisation has already occurred and a deletion has not been synchronised correctly.
Note: automatic data monitoring always checks all appointments and tasks within a period of one week in the past and one month into the future, relative to the day of the check.
4. Manual synchronisation
You can start manual synchronisation under CRM → Additional functions → “Synchronise appointments/tasks”.
The appointments and tasks are synchronised directly with the employee's Outlook. The software searches for Outlook on the client computer and synchronises the appointments and tasks. This is why changing the employee is not possible in this window.
After synchronisation has been completed again, the log file “OutlookDEBUG.log” is created and the log “OutlookSync<user ID>.log” can also be checked.
If there are problems with this method of synchronisation, the issue is usually caused by a single data record, which is always the last one in the file “OutlookDEBUG.log”. You should examine this record closely to determine why it cannot be synchronised.
For further information, see the Help for the window “Synchronise appointments/tasks”.
5. Analysis of synchronisation issues
If there are synchronisation issues, perform the following checks to rule out incorrect settings.
- Run the login details test and review the log. This will reveal if there are any issues with the user login details or synchronisation user login details.
- Use the “Status of BMDNTCSSyncService” function in the window “BMD synchronisation data” to check whether BMDNTCSSyncService is currently running.
- Check if anything has been entered in the “Note” field in the window “BMD synchronisation data” and review the status of the listed data records.
- Check the log file BMDMergeService.log to see if any errors have been logged.
- If you cannot identify the error using steps 1–4, please send either the full login details test log (step 1) or the file “BMDMergeService.log” (step 4) to BMD for analysis.


