1. Steps for setting up BMD Web applications
This guide is for skilled computer administrators with experience in working with the Internet Information Web Server. On request, our IT support team can set up the web applications for you. To make an appointment, please contact: termin@bmd.at
1.1. IIS must be installed on the web server with the following role services (in addition to the default installations)
1. Dynamic Content Compression
2. ISAPI Extensions
3. HTTP Redirection
4. IIS 6 Management Compatibility
- IIS 6 Metabase Compatibility
- IIS 6 WMI Compatibility
PowerShell |
Add-WindowsFeature Web-Server,Web-Dyn-Compression,Web-ISAPI-Ext,Web-Http-Redirect,Web-Mgmt-Console,Web-Mgmt-Compat,Web-Metabase,Web-WMI |
Note:
A web application can process up to 30 concurrent users. For more than 30 concurrent users, you have to set up an appropriate load-balancing solution. To do so, please contact the BMD IT support team: technik@bmd.at
BMD Go does not require a separate application pool. It is sufficient to set up the BMD Web application with an additional entry in BMD.ini.
BMD online application is also part of BMD Web. It is opened via a special parameter: http://.../bmdweb/bmdweb.dll/STARTFUNC/?func=MCS_FRMONLBEWWEB_CREATE
1.2. Create a separate Windows user
This user is used to run the application.
Web server = BMD server
Create user as a local user (or as a domain user)
Web server ≠ BMD server
Create user as a local user (or as a domain user) directly on the web server
1. Username: e.g. bmdcom-sa (We recommend creating a separate user for each web application.)
Web application | Username |
BMD Com | bmdcom-sa |
BMD Web | bmdweb-sa |
BMD online application | bmdweb-sa |
BMD web service | bmdntcsws-sa |
2. Password: any complex password
3. The user cannot change the password and it never expires.
4. Group membership
- User or domain user
- IIS_IUSRS
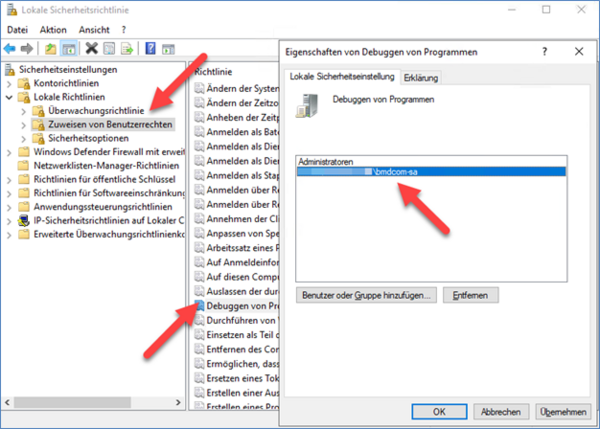
The created user must be granted permission to “Debug programs”. This either has to be configured in the local security policy or in the group policies.
1.3. Create the folder structure on the web server according to the web application in use
1. C:\Inetpub\“web application“
Web application | Folder structure |
BMD Com | C:\Inetpub\bmdcom |
BMD Web | C:\Inetpub\bmdweb |
BMD online application | C:\Inetpub\bmdweb |
BMD web service | C:\Inetpub\bmdntcsws |
2. Grant the respective user (e.g. bmdcom-sa) permission to “Read, execute” for the folder “bmdcom” and remove the group “User” (NTFS inheritance has to be disabled in the advanced security settings).
3. Create the folder “LOG”.
4. For the folder “LOG”, you have to grant the user (e.g. bmdcom-sa) permission to “Change” and “Write”.
1.4. Copy the necessary directories and files to the web server
1. Copy \\“BMDSERVER“\BMDNTCS_PGM\BMDWEBCORE2_SubFolder.zip to the previously created folder “bmdcom” and unpack it.
2. Copy \\“BMDSERVER“\BMDNTCS_PGM\bmdwebcore2.dll to the previously created folder and rename it according to the web application, e.g. bmdcom.dll (except BMD web service).
CAUTION! Danger of confusion! The files BMDWEBCORE_SubFolder.zip and bmdwebcore.dll are used for legacy BMD Web/Com applications.
Web application | .dll |
BMD Com | bmdcom.dll |
BMD Web | bmdweb.dll |
BMD online application | bmdweb.dll |
BMD web service | Here, you have to copy the file bmdntcsws.dll (instead of bmdwebcore2.dll). |
Example (BMD Com):
1.5. Create BMD.ini on the web server
1. Create the file “BMD.ini” in the directory of the web application “bmdcom”.
2. Depending on the constellation, there are different templates (please adjust the paths accordingly).
PLEASE NOTE: if the paths contain spaces, enter them without “”!!
The entries “ALIASCONFIG” and “ALIASNAMES” have to match the entries in the global BMD.ini which can be found in the general BMD NTCS directory.
Please also note that entry is case sensitive. Moreover, it must be possible for the web server to resolve the SQL server name (if DNS resolution is not possible, please specify it via the HOST file on the web server). This parameter defines the authentication type.
Constellation | Content of the BMD.ini |
BMDSERVER = WEBSERVER | [BMD] DATA=D:\PROGRAMME\BMDSoftware\DATEN
[BMD\ALIASNAMES]
[BMD\ALIASCONFIG] BMDSERVER\BMD:BMD=ENCRYPTED, EXTENDED or SQL |
BMDSERVER ≠ WEBSERVER
| [BMD] DATA=C:\BMDUpdateservice\DATEN
[BMD\ALIASNAMES]
[BMD\ALIASCONFIG] BMDSERVER\BMD:BMD=ENCRYPTED, EXTENDED or SQL |
1.6. Depending on the web application, BMD.ini has to be extended.
Web application | Extensions in BMD.ini |
BMD Com | [BMD\BMDCOM2] DBALIAS=BMDSERVER\BMD:BMD FILESDIR=C:\Inetpub\bmdcom\FILES |
BMD Web | [BMD\BMDWEB2] DBALIAS=BMDSERVER\BMD:BMD FILESDIR=C:\Inetpub\bmdweb\FILES |
BMD online application | Only the BMD Web entry is required here. |
BMD web service | No additional entries required |
1.7. Special constellations
1. In the case of BMD Go, the functionality of BMD Web should be deactivated completely.
Web application | Extensions in BMD.ini |
BMD Go | [BMD\BMDWEB2] |
2. In the case of BMD online application, the functionality of BMD Web should be deactivated completely.
Web application | Extensions in BMD.ini |
BMD online application | [BMD\BMDWEB2] |
3. The default timeout of 30 minutes should be adjusted.
Web application | Extensions in BMD.ini |
BMD Com | [BMD\BMDCOM2] |
BMD Web | [BMD\BMDWEB2] |
1.8. Setup in IIS
(only different when it comes to the names of individual web applications)
1. Set up an application pool according to the web application.
Web application | Name of the application pool |
BMD Com | bmdcom |
BMD Web | bmdweb |
BMD online application | bmdweb |
BMD web service | bmdntcsws |
Example (BMD Com):
3. Add a new application (according to the web application) using the context menu of the Default Website:
Web application | Name of the application |
BMD Com | bmdcom |
BMD Web | bmdweb |
BMD online application | bmdweb |
BMD web service | bmdntcsws |
- Specify the application pool.
- “Connect as” → define the respective user, e.g. bmdcom-sa.
Example (BMD Com):
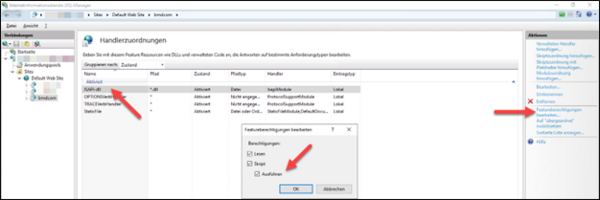
6. The DLL file of the web application still needs to be added as an ISAPI in the ISAPI and CGI restrictions (at the level of the web server):
Web application | ISAPI or CGI path |
BMD Com | C:\Inetpub\bmdcom\bmdcom.dll |
BMD Web | C:\Inetpub\bmdweb\bmdweb.dll |
BMD online application | C:\Inetpub\bmdweb\bmdweb.dll |
BMD web service | C:\Inetpub\bmdntcsws\bmdntcsws.dll |
Example (BMD Com):
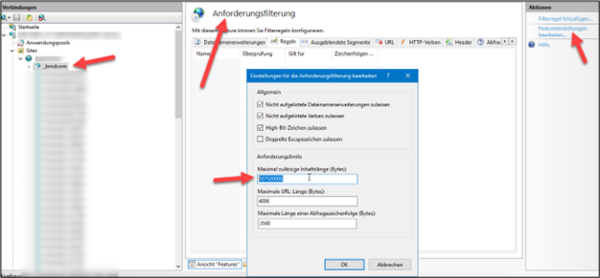
7. Go to Request Filtering for the respective website and increase the upload limit of the application to slightly over 100 MB (e.g. 107520000 bytes), as the default value in BMD NTCS is 100 MB. This ensures that the IIS limit is high enough and the limit in BMD NTCS is reached first so that a corresponding BMD NTCS message is generated when the limit is exceeded:
Example for BMD Com:
1.9. Set up automatic update service
Setting up an automatic update service depends on the constellation (adjust paths accordingly). You have to set up and start the update service. Once it has been completed (entry in the log: update complete), you can test accessing the website.
Constellation | Content of BMDService.ini |
BMDSERVER = WEBSERVER |
|
BMDSERVER ≠ WEBSERVER
|
|
1.9.1. Special constellations for update service
The application pool running on IIS is automatically restarted at midnight. If you want to define a different time for this, you have to make the following entry:
Extensions in the file BMDService.ini |
[BMDUPDATESERVICE] |
2. Troubleshooting
- Check if all the required ports from the web server to the application server are reachable—see System requirements: BMD web applications.
- The website displays a “Service unavailable” notification and the application pool is stopped automatically each time:
- Check whether the correct password has been entered for the user bmdcom-sa on the website as well as in the application pool.
- Check whether the permissions for the required directories are correct.
- Check whether the user bmdcom-sa has the permission “Log on as batch processing order” (should be the case by default due to the membership in the group IIS_IUSRS).
- The login window opens but without the background or without text on the buttons:
- The user bmdcom-sa is required to have read and write permission for the BIN, NSL, and FILES directories defined in BMD.ini, in order to guarantee proper operation.
- A database connection error occurs when logging in:
- Check the ALIAS entry in BMD.ini
- Name resolution not possible (especially in the case of a web server in a DMZ)
- Uploading the Databox or sharing documents is not possible:
- The service BMDNTCSSVC must be actively running and the document archive in BMD NTCS has to operate as “storage via service”.
- Name resolution not possible (especially in the case of a web server in a DMZ)
- The browser displays a message stating “Possible DoS Attack...”
- The BMD web applications are equipped with protection against denial-of-service attacks. If more than 20 accesses occur within 5 minutes from one IP address, further accesses are blocked by the web application. You can change this value via a parameter in BMD.ini on the web server. This might be necessary if you are using a load balancer and it is therefore always the same IP which accesses the webserver.
- To do so, set the following entries in section [BMD\BMDWEB2]:
- DOS_TIME_RANGE=5 (time in minutes)
- DOS_ALLOWEDSESSIONS=100 (number of accesses by one IP address)
3. Security recommendations
- All servers should be running on the latest Windows updates and the patches provided by the manufacturers in order to eliminate various security gaps.
- In general, it is advised to follow the corresponding instructions and recommendations by Microsoft in order to run the operating system and its components as securely as possible. For further information, please see: http://social.technet.microsoft.com/wiki/contents/articles/18931.security-hardening-tips-and-recommendations.aspx
Please also refer to our BMD NTCS hardening guide: BMD NTCS: Hardening guide


